
 Baby nests have become very popular nowadays (at least in Sweden) and pretty much all parents either buy one or make one themselves. It’s a fun and easy project that everyone can make! In addition to the baby nest, I made two sheets to use inside the nest. In case an accident would happen, the sheets were lined with waterproof terry with an exception for where the baby’s head would be. The terry’s supposed to be “breathing” but I’m not taking any chances. That part of the sheets is instead lined with a mint cotton fabric.
For this project, I bought:
- 1m mint/green cotton
- ~1,2m cotton fabric with a harlequin pattern
- ~1m cotton fabric with sleeping owls
- ~1m waterproof white terry
- ~2,2m x 2,2m wadding
- ~3m mint/green bias binding
- light grey cord
- 1 cord stopper
This baby nest is suitable for a baby 0-4 months old.
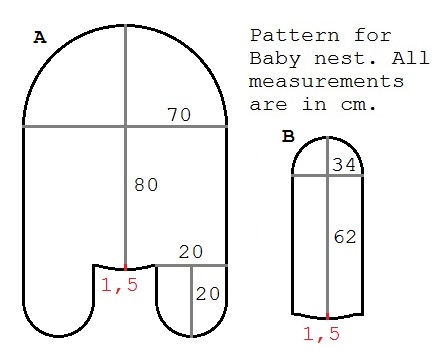
The pattern for the baby nest is rather simple and you need to cut two pieces (A), one for the front and one for the back. Also cut 2-3 pieces of (B) wadding, depending on how thick your wadding is. Baste the pieces of wadding together so that they will keep their shape even when put in the washing machine. Trace 20 cm from the border on the back piece (A). This is where you will sew the back and front pieces together with the wadding in between. Pin right sides together (A) and leave an opening on both small half circles. Turn it right sides out and press the seam.
 Pin the bias binding around the baby nest, from the center of the first half circle to the other one. Sew it carefully in place. A good top stitching is what makes something look awesome instead of just ‘ok’. Use a safety-pin to pull the cord through the tunnel that the bias binding creates.


Put the wadding inside and baste it in place before sewing. I pinned it in place but it was difficult to get a good result and I had to re-do the seam. I would highly recommend basting instead of pinning. Fold the rest of the wadding to a long sausage and stuff it inside the opening on one of the sides. Sew the openings shut. Also sew the opening for the first wadding (B) shut and add some bias binding for a nice finish.


The sheets are pretty much the same size as (B) and if you want to make it only out of cotton fabric follow these instructions. Cut two pieces of the B pattern. With a seam allowance of 1cm, sew them face sides together but leave a small opening. Turn it right sides out. Give it a good press with the iron and then top stitch 2mm from the edge all the way around the sheet, now closing the opening.
If you want to use waterproof terry you need to make sure that you don’t put the plastic where the baby’s head will be. If you look at the picture below, the white is plastic terry and the mint is regular cotton fabric. In this case you cut one B piece for the front. Then cut the B pattern in two parts and add 1cm seam allowance to both pieces. Cut the top piece in cotton and the bottom in terry. Put the cotton and plastic facing each other and sew them together. Press the seam allowance to one side with your nails. Don’t use an iron for this or the plastic will melt! Top stitch the seam allowance in place. Then put the front fabric (in this case owl fabric) and plastic facing each other and sew them together but leave an opening. Turn it right sides out and top stitch to close the opening.
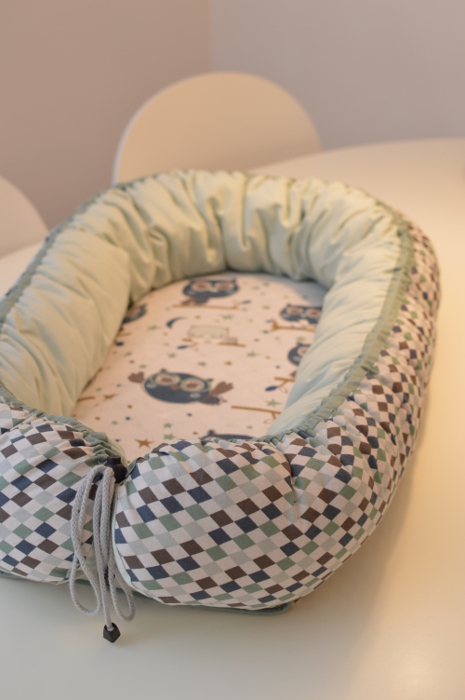
To finish of this quick guide, here’s the finished baby nest!


I planned on making a baby nest + sheets before the baby arrived and I was halfway through this “2 day” project when it was time to go to bed. Quite pleased with my progress, I said to my husband “The baby nest will be finished tomorrow and afterwards we can just sit back, relax and wait for her arrival”. This totally jinxed it as my water broke 2 hours later and our daughter Charlie was born the next morning. Let’s just say it took me more than two days to finish the baby nest. :)

March 21, 2016 at 12:50
Amazing! That looks right from the store!
March 21, 2016 at 13:50
Thank you! :)
January 14, 2018 at 13:33
Ont ne sais pas avoir le gabarit pour l’imprimer svp ?
January 24, 2018 at 15:17
No, sorry. You will have to draw it by hand, based on the measurements given in the picture.
March 21, 2016 at 14:48
Congratulations with your adorable daughter!
I had never heard of a baby nest before. Is it used to put her down somewhere without having the risk that she rolls out?
March 21, 2016 at 15:18
Thank you! A lot of parents have their child in between them when they sleep and many of them use a baby nest to guard the child so that you don’t roll over it. Many children even prefer a smaller space. I guess it reminds them of when they were inside their mother. Charlie doesnt seem too picky about that so we don’t have the nest inside her crib. Instead we have it on the couch. It’s nice to have a spot where I can put her without being afraid that she would roll down from the couch :)
March 22, 2016 at 20:27
Ah, co-sleeping is advised against in the Netherlands so I think most parents don’t do it over here so that might explain why I had never heard of a baby nest.
March 22, 2016 at 21:55
It’s advised against here as well but people still do it. But I think it’s considered somewhat safe if you have a baby nest.
July 9, 2016 at 08:54
In my opinion it is not safe! Baby’s can roll over or move there way to the sides. And then they can sufficate in the fabric. I wouldn’t take the risk!
July 9, 2016 at 10:39
Are you talking about the waterproof terry or baby nests in general? Because I would never use the terry where her head would go. When it comes to baby nests in general I would actually consider them more safe than any other option. For example, the baby is much safer in the nest in the bed than lying next to the parents in bed. Small babies generally don’t roll over until they’re around 3 months old ( and that is considered early). And even then, the “walls” of the nest are quite high and that makes it very difficult for the baby to roll. My daughter rolled from tummy to back when she was 7 weeks but she could never roll in the nest. And when she was around 3 months she had outgrown it :)
Another aspect to consider is the risk of sudden infant death syndrome. I would actually say that a baby nest helps prevent SIDS just because the baby will sleep on its back and not on the side or tummy.
But if you’re worried, don’t use it. It’s supposed to be a nice and cosy place for your baby, not something that will turn you into a nervous wreck.
June 7, 2017 at 13:51
I am a mother of seven children. Baby nests are good when used for the first three months , in my opinion. Its much better for both baby and patents if baby moves to private( but monitored) room by that age. It’s very stressful to train a child to sleep alone after that age. Trust Me!
You baby nest is adorable! Thank You such for sharing it!😊
Pingback: Baby nest free sewing pattern & tutorial – sewing mania club
August 1, 2016 at 14:23
Thanks for this post. I’ve just paid £160 in the UK for a SleepyHead sleep pod (baby nest) as they have just made it over here. It’s amazing and my son sleeps so well in it. It’s considered very safe for co sleeping and is fantastic as a travel cot option too. I wouldn’t be without mine but the next size up is almost £300! So I was looking at how to make another one and/or a bigger one. This is perfect. I can’t wait to try it.
Yours is beautiful by the way. xx
August 1, 2016 at 16:44
Omg, that’s expensive! I’d say that Charlie outgrew the nest at around 3-4 months when she was 64cm tall. But the main reason for putting it away was that she started rolling around and we didn’t want her to fall down from the sofa (where we had the nest).
I’m glad you liked the tutorial :) and good luck!
August 5, 2016 at 14:16
Can I ask, what do you mean by basting the wadding?? I am just a beginner so I’m not sure on what all these terms mean. I’ll have to google what ‘bias binding’ is too.
Thanks.
August 5, 2016 at 16:04
Of course :) basting is when you use a loose running stitch (up and down through the fabric) to roughly sew something in place before you sew the “real” seam. You remove the basting when you’ve finished the real seam.
The reason why you use basting instead of pinning the fabric is that basting keeps the fabric in place better than the pins does.
In this case I would recommend basting two seams and then sew the real seam in the middle of the two. Good luck!
August 5, 2016 at 16:06
Ah I see. Thanks so much. I’ll definitely do that. xx
December 25, 2016 at 00:57
I live in the U.K. and I bought mine from John Lewis in 2015. I paid just over £80:00. Fantastic item for a keeping baby secure and draught free.
I would highly recommend it. Might try out the pattern Thank you
August 14, 2016 at 16:24
Hi! I love this tutorial. I’m actually almost halfway done making it but I don’t understand how to make the sheets. I’m a beginner as well, so sorry for the stupid question but do you just sew the owl sheet onto the nest? Or it there a way to make it removable somehow for easier cleaning? Thank you!
August 14, 2016 at 20:47
I’m glad you like it! Hm, I should probably include a small tutorial for the sheets since you’re not the first to ask about it. Don’t sew the sheets into the nest, it’s much better to leave them separate.
If you want to make the sheet only out of cotton fabric follow these instructions. Cut two pieces of the B pattern. With a seam allowance of 1cm, sew them face sides together but leave a small opening. Turn it right sides out. Give it a good press with the iron and then top stitch 2mm from the edge all the way around the sheet, now closing the opening.
If you want to use waterproof terry you need to make sure that you don’t put the plastic where the baby’s head will be. If you look at the picture, the white is plastic terry and the mint is regular cotton fabric. In this case you cut one B piece. Then cut the B pattern in two parts and add 1cm seam allowance to both pieces. Cut the top piece in cotton and the bottom in terry. Sew them cotton and plastic sides together and press the seam allowance to one side with your nails. Don’t use an iron for this ;). Top stitch the seam allowance in place. Then put the owl fabric and plastic facing each other and sew them together but leave an opening.
I hope that explains it but if you’ve still got questions, don’t be afraid to ask :). Good luck!
August 17, 2016 at 03:28
what size child is this pattern for? i have a 9 month old and are going away in 2 weeks, i want to make one but worried it will be too small
August 17, 2016 at 08:36
It will most likely be too small for a 9 month old. My baby out-grew it at around 3-4 months. The biggest problem for me then was that she was quite agile and rolled around (and I was afraid she would roll out of it). For a 9 month I would probably consider buying a travel cot bed but if you still want to make a nest (and perhaps put it inside the bed to make it nice and cosy :)), I would definitely make it bigger. You will want to keep the size of the border (20cm) and increase the inner measurements (30x60cm) both in width and length. Because of the cord stopper, it’s also a bit adjustable in size (mainly length). Perhaps 80-85cm in length and 35cm in width would work for your baby?
August 29, 2016 at 22:28
For the outer Harlequin fabric, do you use pattern B? and what does the 1,5 mean underneath?
August 30, 2016 at 06:12
For the harlequin and mint fabric I use pattern A. B is used for the stuffing and sheets. Notice how there’s a slight curve at the bottom? When you draw the pattern, first make a square box, then add 1,5cm to the middle of the nest. Draw a curve from the corners of the box towards the middle.
September 25, 2016 at 06:00
I’d love to make one of these for my toddler. Trying to transition him out of our bed and into his own room. I certainly can’t afford the $260 they want for a grand size in the US. What dimensions would you suggest for toddler sized?
September 25, 2016 at 08:01
I’d say it depends how big he is? Please read my answer to Kira’s comment. Measure his length and add a little extra. Also adjust the width. Since it’s a toddler, I would remove the extra cord (that makes it resizable) and the cord stopper because of the risk of strangulation. Just feed the cord into the attached bias binding, shape the nest so that it fits your boy. Then sew the cord in place at both ends of the bias binding “tunnel” and cut off any extra. This will leave the nest open at the bottom. I would also consider increasing the border a bit.
Another (and perhaps simpler solution) is to make two large round pillows and put them on both sides of the bed. This is probably what I would do. Don’t forget that babies tend to get very creative when it comes to climbing on things :).
September 25, 2016 at 08:13
Good thoughts! Thank you!
September 28, 2016 at 04:11
Absolutely perfect!! I love it!! 😊
September 30, 2016 at 05:24
I’m new to sewing. Is there a pattern or do you freehand it using your measurements? Thank you
September 30, 2016 at 06:46
You freehand it using the measurements. If you haven’t got any pattern paper, just tape a bunch of regular papers together. Good luck :)
October 2, 2016 at 15:47
Thank you so much for this blog. I finished the nest today and it is super cute.
I couldn’t find the boas binding so I ised 3/4 inch ribbon instead. It came out pretty good and may be even easier to sew.
October 2, 2016 at 22:13
I’m glad you like it and that your project turned out well!
October 4, 2016 at 01:21
Thank you for the tutorial!! I agonized over a couple steps but once I got going it made sense and I’m so in love with the results!! I only wish I had one when my little guy was a baby since as much as we said he “would never” sleep in our bed he ended up passed out with us in those wee hours of the morning pretty much all the time and I would have felt more at ease with a baby nest. I can’t wait to start making these for gifts! So many options with colors and adding lace trim and a variety of sheets (I used flannel).
October 4, 2016 at 05:46
I’m glad to hear it worked out well for both you and your baby! :)
October 4, 2016 at 01:22
And they are great for traveling!!
October 6, 2016 at 18:51
I’m going to try and make one for my brother and his wife here in the US so I will be attempting to draw out the pattern in inches. thanks so much for posting this.
October 12, 2016 at 18:35
Hi, Thank you so much for the tutorial! I love it and i am planning to make one of these. I was just wandering what kind of wadding have you used? how thick? Also, how did you cut the wadding for the walls? did you use a pattern? i am not sure if i understand how to fill in the walls hmm. please help the begginer..
October 12, 2016 at 19:07
Ofc I’ll try my best to help you :) if I recall, the wadding was around 2cm thick but it was quite fluffy so I used 3 layers for the bottom. For the walls, I roughly measured the length of the wall. Then I took my big piece of wadding and rolled it into a sausage a bit longer than my wall. To make it stay in place, just roll some regular sewing thread around it. Then proceed to push the wadding sausage into the hole in the wall. Tuck in as much as you can and then cut off any leftovers before you close the holes
October 28, 2016 at 15:08
I am new to sewing. I have a question about how to sew on the bias? How do you sew it on so it lays flat? Does it need to be sewed on before you put the two layer of pattern A together?
October 28, 2016 at 22:30
You need to sew the two layers of pattern A together before you attach the bias binding. Press the seam open the best you can and then pin the bias binding around the nest centered on the seam you made before. Look at the pictures to better understand how it’s pinned. The trick to making it lay flat is to only sew small increments around the curves. When the presserfoot reaches a pin, remove the pin and stretch the fabric so that both fabric and bias binding lays flat. When you sew the other seam on the bias binding you might not need any pins. Just stretch a couple of cm of fabric and sew, stretch and sew… I hope that answers your question, good luck!
October 30, 2016 at 15:20
Do you have a pdf file for the baby nest you could send me please. would love to make one before baby comes
October 30, 2016 at 19:32
No, I don’t have a PDF file for the pattern. You’ll have to draw the pattern yourself based on the measurements in the picture. Just tape a bunch of regular papers together and start drawing :)
November 15, 2016 at 14:09
Hi Nicole,
I really like your baby nest. It looks beautiful! :)
Does the above shown pattern already include a sewing allowance or do I have to add one? If so, would 1cm sewing allowance be suitable?
Thanks,
Kristina
November 15, 2016 at 14:57
Hi, thank you :) I think I included a 1cm seam allowance in the pattern. To be honest, I think I intended to add 1cm seam allowance to the pattern but by the time I was done with it I just couldn’t find the energy to do anything more with it. I just figured that it might affect the size of the walls a bit but it turned out fine anyway. I’d say 1cm is perfect, adding more just adds bulk that you need to cut off in my opinion.
December 9, 2016 at 17:35
Hi, I am new to sewing get and would love to make this Baby’s nest for my soon to be newborn. I have a question with your measurements what does 1,5 2,2m x 2,2m mean? Is it 1.5 cm & 2.2m? Or use 2- 2m wadding?
Just not sure on the commas used
December 9, 2016 at 19:21
The “1,5” written in red is one and a half cm. “2,2 x2,2” means “approximately 2m and 20cm in both length and width.
December 28, 2016 at 22:07
Hi Nicole! I’m so excited to have found your pattern for making a Swedish baby nest! We are expecting our 3rd baby, and I thought this would be something extra special to have on hand—especially for bed sharing. My question: are you glad you sewed in the batting for the mattress? Do you think it would be ok to have a foam or removable mattress separate from the bed? Also, do you think a 100% cotton poplin fabric would work well for this project? Thank you!
December 29, 2016 at 11:10
Hi and congratulations! First of all, I think cotton sounds like a great idea. My only comment on the fabric choice is that you need to prewash it to prevent shrinkage. In my case, I probably should’ve made the mattress removable since my daughter left milk puke pretty much all over the apartment :) but a towel in the nest worked pretty good as well. Good luck on your project!
February 6, 2017 at 02:09
Hi how much cord did you use please
February 6, 2017 at 08:21
I think it was 2 or 3 metres.
February 20, 2017 at 21:47
Do you have a link or PDF to print the pattern?
February 20, 2017 at 22:23
No, you’ll have to sketch it yourself based on the drawings and measurements. Start with a large rectangle, draw a center line and continue from that. The rounded parts are half-circles.
March 2, 2017 at 19:41
Thank you for sharing! This will be perfect for my new grandchild. I wish there was a way I could print the instructions.
March 14, 2017 at 14:03
Hi im trying to make yoyr baby nest pattern but im quite new to sewing and making things! I saw you said that you added the 1.5 cm at the base to get the curve at the bottom of A and B how to you curve the top ? Is it just free hand? Ive measured it all out but its all just lines and boxes at the moment im worried ill get it wrong if i just free hand the curves at the top
March 14, 2017 at 14:38
The bottom one (1.5cm) is indeed free hand drawing but you can use mathematics for the other ones. I’ve made both the large curve at the top and the two smaller curves at the bottom as half-circles. Mark the center of each circle and use the radius (diameter/2) of the circles to draw perfect half-circles. I hope that explains it for you :)
March 10, 2018 at 09:18
I’m having the same problem also. It would be helpful if you could indicate the start of the arch for pattern A and B? I got the lower parts quickly as it indicated 20×20 and was able to make perfect arches of that one. However, the top one, I have no idea where to begin the arch. It would be nice to have the actual value in cm from the top of the pattern to the beginning of the arch?
Thank you so much! I’m 18weeks along, got all the materials already. This really helps me do something productive while waiting for my sweetie pie!
March 13, 2018 at 23:31
Think of it as (invisible) rectangles and circles. You know that the diameter of the big arch is 70, that means that the radius of it is 70/2=35cm. You also know that the total length of the babynest is 80 cm (think invisible rectangle) + 1,5cm (supersmall arch in the bottom). That means that you draw the 80×70 rectangle, and then draw a circle with a radius of 35cm, 35cm from the top of the rectangle. I hope that explains it? Good luck and congratulations :)
March 16, 2017 at 21:48
I live in the USA and I apologize in advance…what does 2,2m mean? 2meters and 2cm? How about 1,2m…..I can easily measure in metric, but I am unsure as to the meaning of the comma…. I am sure it is simple. Thank you.
March 16, 2017 at 23:02
You’re not the first to ask :) The reason for the confusion must be that we use ‘,’ instead of ‘.’ . “2,2m” means 2m and 20cm. “1,2m” means 1m and 10cm. “2m and 2cm would’ve been written as “2,02m”. Good luck!
March 17, 2017 at 19:58
Thank you so much! This will help greatly!
March 17, 2017 at 20:25
No problem, always happy to help :)
March 17, 2017 at 20:06
I am re reading all the posts in case there was a question I forgot to ask. :-))
March 19, 2017 at 23:26
Please make a note that the owl fabric is for the extra sheet (correct?) and that to actually make the baby nest itself you just need the 2,2m fabric and the wadding(batting).
Are you familiar with the product, “PUL?” It is a waterproof sheeting used in diaper liners.
I am more of a tactile learner so I figured things out as I progressed. I will be 60 at my next birthday and I am making these for my grandchildren I have 9 and 3 more due between now and next September! My pattern is finished and I have way more fabric than I need! I will be making sheets and burp cloths with the extra!
Quilters in the states buy what we call “fat quarters” 45.72cm x53.34cm or 18in x 21in….. I bought some cute ones for burp cloths and extra sheets….they may be a little short….😄
April 10, 2017 at 00:39
Could you use polyester fill for the tubes of the nest? I have some but can get the quilt batting if polyester fill shouldn’t be used. Thanks
April 25, 2017 at 13:53
Sorry for the late reply. I guess you’re interested in the safety aspects and I’m not certain that one is better/worse than the other. My best advice is to try breathing through it and make a decision based on that.
Pingback: Crib-Building and Nesting – Living Like Great-Grandma
April 26, 2017 at 18:41
Wish I’d known about these when we had babies in the family. I’m now in the between stage , waiting for grand-babies!! But it occurred to me that these would also make great pet beds (depending on your pet’s size), once the babies have outgrown them. I like that you can make extra sheets & love the idea of using PUL, to make them easier to clean.
April 26, 2017 at 19:18
Hi,
How far down is the main curve on A? I see that it is 80cm total (plus the 20 on the bottom curves) but can’t figure out how far the big curve comes down.
I’m in the US and wish we would convert to the metric system like the rest of the world! :)
April 26, 2017 at 20:32
Hm, If you mean the large half-circle then the radius is 70/2=35cm. With that said, the horizontal line (70) is 35cm down from the top. Also notice that the radius on the small half-circles are 20/2=10cm. Hope that helps :)
April 27, 2017 at 18:16
I very successfully made the nest, I converted the measurements to inches…but my tools have both metric and inches. If you are referring to the “legs” of the nest they are roughly 7 and 3/4 inches below the 80cm. If you need help you can contact me at livevermore@hotmail.com. I live in Idaho and I am on Facebook . Suzanne Stratton Livermore.
I plan to make two more as I am expecting two more grandchildren this summer!
I am willing to help, I don’t want to be annoying!
April 27, 2017 at 20:16
Congratulations on your baby nest, and more importantly, your grandchildren! Have the youngest addition to the family tried the nest yet?
I’m in the middle of a huge house renovation at the moment, which means that I’ve taken a break from blogging. I don’t have any plans on making a pattern converted to inch in the near future but thank you for offering to help. It was very kind of you :)
June 9, 2017 at 23:34
Oh, YES! They love it!! I am making some more! I have found that it helps to stay-stitch the section at the bottom that is eventually hand sewn. This is a great pattern and I am so very appreciative that you have shared it with the public.
April 27, 2017 at 22:03
Yes!! Little Emery love his nest! I wish I knew how to post a photo of him in it!
July 8, 2017 at 16:59
Hi Nicole! Thanks for this wonderful pattern. My best friend’s baby will appreciate it, too (in a couple of weeks!). I’ve already started and just sewed both A partes together. Now I’m going to pin & sew the bias tape, but I don’t understand how to machine-sew it. It has to be done by hand, am I right? Many thanks in advance!
Silvia
July 8, 2017 at 20:04
Hi, I’m glad you like it :) it’s possible to machine-sew all the bias binding. The binding that is used for the cord must be pinned carefully before sewing. Since you left a big opening at the bottom, it should be fairly easy to stretch the seam flat over which you place the binding. Remember that slow and steady wins the race and to always keep the fabric flat right around the needle. A tips when sewing tricky seams like this one is to keep your needle in the fabric, lift the presser foot and flatten the fabric. For some sharp curves I have to do this every centimeter. For the binding that goes in the bottom, you should be able to first sew in one of the folds. Then fold it over, press, pin, (possibly baste it in place) and then sew. Good luck!
July 9, 2017 at 12:30
Thank you very much, Nicole! Now that you made clear that it can be done, I’ll know it’ll be my only fault 😂😂
July 9, 2017 at 14:12
Haha, good luck :D
July 10, 2017 at 06:20
Hand baste the seam tape centered on the outside seam from the the base of one “leg” all the way round to the other leg. Then you may successfully machine stitch each edge of the seam tape all the way round. Then pin a safety pin on the end of your cord and slip it through the entire length of the casing you just made. Then you are ready to insert the center batting and stitch around it. Hooray! You are almost finished! I just hand basted my the seam tape onto my fourth! Baby nest tonight. I will have 12 grandchildren by September. I heard about the baby nest in March and have made three and now I will finish my fourth one tomorrow! I wish I knew he w to post a picture.
Pingback: En attendant bébé… – Et hop au Canada! ou ailleurs…
August 27, 2017 at 17:28
Hi Nicole,
I really love your baby best.
Where exactly did you buy the fabrics from? Especially the owl and harlequin pattern :-)
Thanks and best regards
Maren
August 27, 2017 at 21:13
Hi, I’m glad you like it. I’m pretty sure I got it from “Stoff & stil” but that was two years ago so I don’t think they have it in stock any more.
August 28, 2017 at 03:52
Hi! I have now made five baby nests…. The first four were of cotton broadcloth. The fifth was for a friend and I asked her to buy and pre-wash the fabric. She purchased Cotten flannel. I am pleased to say that it turned out beautifully! I wondered how easily it would receive the stuffed tube of batting. Not a problem! Oh, how I wish I knew how to upload photos in the comment box? ❤️
August 28, 2017 at 06:49
Not sure how to do that either but if you send a message to me via the contact-info page (think you’ll find it somewhere top right) I perhaps can upload them to the post :) you probably can upload them directly but you’ll be able to send them to me later on in an email.
August 28, 2017 at 16:19
Great! Thanks. I appreciate very much your pattern and ingenuity! What a marvelous addition to baby care!
September 11, 2017 at 22:12
Me parece preciosa la confección de tu nido. En mi país no se ha oído hablar de él todavía. Voy a hacerle uno a mi futuro 3er nieto. Espero que quede tan lindo como el tuyo. Es muy agradable ver tus explicaciones y comentarios sobre las dudas y pareceres de aquellos que quieren hacer uno…. No es usual tu amabilidad por éstos tiempos. Gracias por compartir tu creatividad. Soy Virginia de Uruguay y desde ya tu admiradora.
September 14, 2017 at 15:10
Could you tell me how much it cost to make this? I know I do not want to spend over $200 on a dock a tot lol, I feel like this is the better way to go!
September 14, 2017 at 19:23
It really depends on what materials you get, for example if you use cheap or expensive fabric. I think mine cost me around 50-60USD to make but it’s been almost two years so I can’t say for sure.
September 14, 2017 at 23:43
It depends on where you shop! In the USA, Walmart has fabulous choices. I have made six so far. I like flannel the best. Figure $3.95/yard…you will need approximately $16 for fabric(4yards) PUL is $12 a yard, but you only need 3/8 of a yard to make 4 sheet inserts…12″x13″ each. Cord is $2-$4 , seam tape is $3 tops. Thread and then 1inch thick batting, 90″ wide….you need 1&1/2 yards. Mine cost $4.50/ yard and I consider that very good. Total $35 at the most. Please do not shop at high end fabric stores. You are spending YOUR $$on THEIR rent or name. Have fun
December 30, 2017 at 20:16
@Suzanne, I have found that it makes a big difference in how much you spend for fabric. Cheaper fabrics tend to shrink more and wear more easily. Good quality fabrics will last longer, feel much nicer on the body and don’t shrink as much. And you don’t have to shop at high end fabric stores to get good quality fabrics – I buy most of my fabrics on Etsy or online stores like hawthornethreads.com or fabric.com. I’m not saying there is anything wrong with buying fabric on a budget – i do it all the time. But there are advantages to buying a better quality fabric – the price doesn’t come from just the name of the store. :)
December 12, 2017 at 21:22
Thank you for this tutorial, but i am french so …..please a translation.
December 30, 2017 at 20:18
@Audo, you might want to try Google Translate – I use it all the time for translating foreign websites. https://translate.google.com
January 3, 2018 at 13:47
Thank you for the Google translate link :) I tried linking a translated version but for some odd reason my phone wouldn’t work with me on that…
Pingback: teeny tiny diy – Fensišmensi
Pingback: Pandababy – DaMiRo
February 14, 2018 at 22:48
I’m really enjoying making this. I actually made a little mattress that can go in the washing machine. I’m also gonna add a zipper to the bottom of the head side of the roll (so the stuffing can be removed and nest can be washed) ……. my huge question because I can’t seem to wrap my head around this ……. how is the bias tape sewn on. I understand how to pin the tape. My confusion is in the mechanics of the sewing. How do u open up the fabric so you aren’t sewing on fabric that isn’t supposed to be sewn? Do u only sew the outer part of the nest and use the hole at the ends to move the fabric across the sewing machine. Hope this makes sense…
February 14, 2018 at 23:08
Hehe, yes that’s how you do it :) it’s a lot of fabric in one place so just sew carefully. I think you can wash it without removing the stuffing but I guess drying it could be troublesome if you don’t have a machine for that. If you’re gonna make the stuffing removable, have you considered making it into one large sausage cushion (made from polyester to make more “slippery”)? That way, I can imagine it would be easier to remove it.
However, one thing I learned after my child was born is that body fluids never stay on that first layer of fabric. Unless it’s a raincoat it will soak through Everything, including the stuffing. So in the end you still might have to wash the stuffing.
February 14, 2018 at 22:52
Actually haha I just read the comments and found the answer :)
February 17, 2018 at 10:02
I am currently making this just now for a baby gift. Your tutorial is so easy to understand. I love the fabric you used. The one I am making has little ladybirds printed on it as new mum loves ladybirds. Thank you.
February 17, 2018 at 19:48
Ladybirds sounds lovely! I’m glad you liked the tutorial :)
March 13, 2018 at 21:29
I do not understands what you mean by the 20 cm around the border?
March 13, 2018 at 23:22
Do you mean the sentence “trace 20cm from to border on the back piece”? The border around the babynest (that’s filled with wadding) is 20cm wide in the pattern. When I say trace, I mean that you should make some markings so that you’ll know where to sew later on. Look at the picture below the pattern. Your supposed to make a sandwich of back pattern piece, some wadding and then front pattern piece. Then you should sew a seam around the edge of the white paper in the picture. (The white paper indicates where you should have traced). This seam will hold the wadding in place and also help create the tunnel for the wadding-stuffed border that goes around the nest. I recommend that you read the entire guide before you start sewing. I find that it usually gives me a good overview and that it’s easier to understand the details later on. I hope that explains it :)
March 26, 2018 at 17:59
I made one for my grandson. I found putting the sausage of wadding in difficult and wondered why I had offered to make the nest, but baby Martin will only sleep in the nest and that makes me feel wonderful. He looks so sweet in it.
Thank you for the clear instructions
May 27, 2018 at 17:11
Hi, Nicole! I am presently working on this baby nest. I found so many tutorials for these that it was a bit overwhelming at first. But yours seems to be the most comprehensive and easy to follow. Thank you for creating this!
I noticed that several people were asking for a PDF pattern of this. I know most of them have probably long since finished their nests (or given up on the idea!) but if people are interested, I have created one. I am a bit of a computer geek, and love to have things “done right”! Lol! So I managed to make a pattern that can be printed out on standard (US standard) letter paper and then taped together. If there are still people out there who are interested in this, they could contact me and I could send them a file.
Thanks again for this great tutorial. BTW, do you happen to remember where you purchased your fabric? Chances are it is no longer available, but I love the prints!
Anyway, hopefully mine will turn out to be useful and as cute as yours. If I can post a pic, I will!
May 30, 2018 at 11:36
mjwiebe100, I would love a pattern if you don’t mind sending it! My daughter is due in July and I wanted to make a nest for her. My email address is mardee (at) gmail (dot) com. Thanks so much!
May 30, 2018 at 17:09
I’ll get right on that! If you need any help with it, please let me know. I am certainly no professional at this sort of thing, but it worked for me! :)
May 30, 2018 at 12:28
Hi! I’m glad you liked the tutorial! If you’d like to share the pdf via my blog you could email it to me and I can see what I can do. (It’s wordpress so it shouldn’t be impossible to share a file :)). When you say US standard, is it the A4 format?
If you’d like to email me without disclosing you email here in the comments section, send me a message from the ‘about page’.
The fabric is from http://www.stoffochstil.se
May 30, 2018 at 17:15
Thank you Nicole! I would be glad to share it with you! I will send it to you right away. Please let me know if you have any issues with it. I am no professional and this is only the second pattern that I have drafted, so I am sure there may be some issues that may need fixing. But still, it may help someone somewhere! :)
August 8, 2018 at 15:03
Hi, I have made one in the past and free hand the pattern so as I was sewing, I had to make adjustments. Could you send me a copy? My niece is pregnant and would like one. I would appreciate it so very much. Thank you and God Bless.
September 2, 2018 at 15:37
Hi, Tammy! Sorry for the delay in responding. If you could send me your email address, I will get this pattern off to you as soon as I can. Thanks! My email is mjwiebe100@gmail.com.
July 13, 2018 at 20:49
US standard is called Letter here. It is 8.5×11 inches.
Thank you so much for this great project!
July 17, 2018 at 04:33
Hi, Nicole, if you were able to receive the pdf file, can you please let me know the link so I can upload it, please? Thanks!
July 13, 2018 at 20:48
Hi mjwiebe100! What a generous offer! I would love to have the PDF. My email is susan.spears@ymail.com. Thank you so much!
July 17, 2018 at 08:03
I will gladly send it to you! Could I just confirm that your email is @ymail.com? Or did you mean @gmail.com? Thought I had better check first… :)
November 27, 2018 at 22:48
could you send the file to me please my daughter is due December 4 2019 and would love to make this
December 17, 2018 at 18:58
I am so sorry that I haven’t responded sooner – I’ve been away on extended holiday. If you send me your email address (mine is mjwiebe100@gmail.com), I will send you the pdf right away.
July 17, 2018 at 04:32
mjwiebe100, can you also please send the pdf file to me? email address: myblessedmiracles at gmail dot com, thank you!!
July 17, 2018 at 08:04
It’s should be in your inbox. Let me know if you have any concerns or problems with it. Blessings!!
July 12, 2018 at 02:16
Can I use 1 yard instead of 1 meter and this pattern still work?
August 5, 2018 at 09:59
Well, it all depends on the width of the fabric and how you’d like to position the pattern onto the fabric. The full size of the pattern is 2 pieces that are 100x70cm (+ extra magin for how much your fabric will shrink when you wash it, usually 5%).
For my baby nest, I used two fabrics, one with a pattern and one with just one colour. So for the harlequin pattern, I needed a fabric length of 120cm but for the solid colour I could just turn the pattern 90 degrees and in that case ~90 (or 1 yard) would be enough.
However, remember that you need two pieces and if you’re planning on cutting both pieces from a 1 yard fabric, I don’t expect it to fit because you would need a width of at least 220cm (2.4 yards) and fabrics are seldom that big.
Pingback: 10 Free And Easy Sewing Patterns For Babies And Toddlers – Childhood