Yuki Clothing

plain and simple


1 Comment

Asymmetrical Neckline Dress (part2) – the muslin

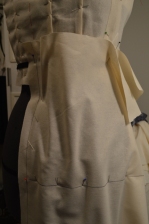
In a previous post, I wrote about making the pattern for this dress and now it’s time to show you what the final product could look like. As you can see, the cotton muslin is a tad bit see-through and enables you to see what the interfacing looks like as well as the outside.

I designed this dress with one thing in mind – to fool people in to thinking that I’ve got an hourglass figure. My body type is actually a mix of pear and hourglass and whenever I gain weight, the pear shape gets more emphasized. For example, if I compare my measurements with H&M’s sizes (who seem to be making clothes for skinny, rectangular people), my bust is 38, waist 36 and hip 40. With this data in mind, I wanted to make my bust appear a bit bigger. I think I succeeded with the front of the dress, however… the back side is another story. The shape of the skirt doesn’t exactly draw the attention away from a certain area.


3 Comments

Asymmetrical Neckline Dress (part1) – making the pattern

Ever since we came back from Japan, I haven’t done much bloggin’ about my sewing escapades. However, this doesn’t mean that I haven’t spent any quality time with my sewing machine. On the contrary, I’ve actually finished a number of projects! The one you’ll be hearing about today is a dress made for a wedding that took place just days before our flight left for Japan.

My first plan was to make something from a book called Pattern Magic 2 by Tomoko Nakamichi. I had my eye set on the “cowl neck” for the back of the dress and “the facing is a curve” for the front. I followed every instruction but the end result looked absolutely horrible. I’m sure something must’ve happened when I picked out the size because it ended up being too big and overall ill-fitting. I quickly abandoned ship and decided to play around with the fabric instead.

This thing is just too big, especially around the waist.

This thing is just too big, especially around the waist.

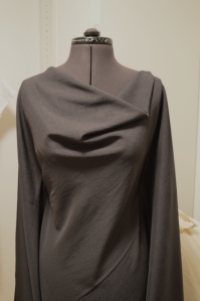
Inspired by the bias drape of the cowl neck, I went for a bias drape on the front of the dress. The fabric has such a nice fall and drapes really well. I’m also totally in love with the colour! Depending on the light it shifts between graphite, brown-ish and green-ish.

Amazingly enough, I found a pretty cool shape on the first attempt and proceeded to make a muslin pattern. For the top, I prepared two muslin pieces. One to go on the back and one for the front. I wanted a smooth neckline without any seams so I took a large piece of cotton, folded it on the bias and basted horizontal to the fold to keep everything in place. To mark the CF (centre front), I basted perpendicular to the folded neckline. The back piece needed a bit more stability and was folded on the crossgrain and then basted in place. The last preparation of the back piece was basting the CB (centre back) line perpendicular to the folded neckline.
First step when draping the front was to roughly fit it over the shoulders and then match CF on the muslin with CF on the dressform. Next step was to mark the bust points to be able to work with the look of the bust darts. Then adjust the shoulders and cut away excess fabric. I decided to only have two bust darts directed towards the centre and down to the WL (waist line). The side seams were pinned in place as well as the armhole. With side seams and CF in place it was easy to pin the bust darts. The same procedure was then repeated for the back piece. The only exception was that I made, in total, 4 darts in the back. To finish off the top, I marked out the WL with a black ribbon and cut off any excess fabric.

The muslin preparations needed for the skirt was to cut out two pieces (front and back) and then mark CF, CB and HL (hip line). I had previously marked the HL on the dressform with a black band and now I only had to match CF, CB and HL to that of the dressform. Next up, I pinned the side seams roughly in place at the HL with a little ease added. Then I added the darts to the skirt, all while matching them to the size and placement of the darts on the top. To add some more shape to the skirt, I pinned the side seams in place while sloping it inwards towards the knees.

Paper pattern:


1 Comment

Tania Culottes – the muslin

What do you get if you take the pattern for a pair of pants and merge it with a pattern for a skirt? The answer is Culottes. Ever since I saw Megan Nielsen’s pattern for the Tania Culottes, I’ve been thinking about trying to reproduce the pattern as a small pattern making exercise for myself.

Judging by the nice fall of the skirt, I concluded that the base pattern for the skirt should be a full circle skirt. This simple sketch shows the basic pattern.

  • Start with a circle, this will be the hemline of the culottes.
  • Divide the circle into 4 parts. This is the start of two front pieces and two back pieces.
  • Make an inner circle for the waistline.
  • Remove two of the 4 parts, there’s no need to make duplicates. Also split the two left into two separate pieces. The split will become the side seam.
  • To make the skirt into shorts and to hide the crotch seam, more fabric needs to be added in the front and back.
  • After the added fabric, there should be a front and a back crotch seam.
  • Finally add a bit of length to the back piece to accommodate for the bottom.

Here’s a tiny, tiny muslin (that probably fits a Barbie doll)!

Only problem is that I really need at least one pair of culottes for our trip to Japan and time is running short. In the end, I decided to buy the pdf pattern and try it out. To my delight, I wasn’t too far off with my first sketch. The pattern is rather easy to follow but hourglass- and pear-shaped women be warned, it looks like this pattern is made for almost rectangle shaped women. For me, there was a small problem with the top of the lining. I had to take in 1-1,5cm on both sides of the two lining pieces. That’s 4-6cm in total :O

Looking rather good if I may say so myself

The Culottes are looking rather good if I may say so myself


13 Comments

Bedspread – a work in progress

My latest project is actually a recycling project where I’ve used 25 pair of old jeans and cut them into squares. Since I didn’t have this many old jeans myself, a bunch of friends came to my rescue and donated trousers that were either ragged or too small (a huge thanks guys!). When I first got this brilliant idea, I never stopped to think about just how many squares I needed to cut and sew together. I only knew that I wanted them to be around 10x10cm. Later on, when I had cut out around 50 squares and wanted to know how many I actually needed, I finally did the maths… I wanted a 2,5×2,5m bedspread which resulted in a staggering 625 squares! But since I don’t like giving up, I just kept on cutting and finally ended up with this.

Yay, now it looks like mini fabric skyscrapers! :D

Yay, now it looks like mini fabric skyscrapers! :D

When it was time to actually start sewing I decided to sort all the different jeans into one stack each. That way it would be easier to distribute them evenly across the bedspread. That tactic worked well and an hour later, I had 25 stacks on my table with each stack containing 25 squares.

All 25 pair of jeans, neatly sorted.

All 25 pair of jeans, neatly sorted.

My first approach to sewing everything together was to sew one row at a time and then sew the rows together. The only problem with that idea was that I had a hard time lining up the seams perfectly. This prompted me to try a new approach that focused more on the fact that it’s squares I’m stitching together. Two squares on the first row are sewn together and then two on the second row. The those four squares are then sewn together. Hopefully the picture explains it a bit better. I have absolutely no idea if that’s how quilters does it or if there’s a better way but it’s working out alright for me.

I had hoped that I would’ve been able to show you a finished project by now, but that’s not the case. Never in my life would I have guessed that making this bedspread would take this much time. Clearly I’ve underestimated my opponent. Not only have my patience and sanity taken a toll during this tiresome project, but two  needles have lost their lives in tragic accidents.

A victim of the bedspread!

A victim of the bedspread!

And this is all I’ve got to show you today. Not many squares left to put together, which is good because I’m running out of thread! :O


7 Comments

Tamoto dress

During the weekend I finally decided on what my next project was going to be, and it’s a dress! I will use two different fabrics for the skirt and the upper bodice to create a bit of contrast. An elastic waistband will be added to give the wearer an accentuated waist, while still keeping the dress comfortable. The length of the skirt should be somewhere over the knee. The upper bodice is made with kimono sleeves and a rather high neckline. For this first version of the dress, I’ve decided to use two soft knits (The one with the flowers is actually another case of buying-fabric-I-have-yet-to-find-a-project-for).

What are kimono sleeves you ask? Well, it’s a sleeve cut in one piece together with the bodice. Don’t confuse it with the traditional Japanese kimono sleeve which is cut as a part of its own.

So far, I’ve finished the bodice and to be honest, I wouldn’t mind just wearing that as a top to the beach in the summer. Darn, I gotta get rid of all the extra kilos I put on during Christmas!

I’m pretty excited about this dress, in my mind it will be amazing and an amazing dress needs a name, right? I wanted to find something that had to do with the lovely kimono sleeve and I consulted Wikipedia for some help. Apparently, the Japanese word for the sleeve (a proper kimono sleeve) is “sode” but that was completely out of the question after my hubby told me to check urban dictionary… Instead, the choice fell on Tamoto. “The Tamoto dress”, easily mixed up with the vegetable but still a nice name for a nice dress.