Yuki Clothing

plain and simple


7 Comments

Tamoto dress

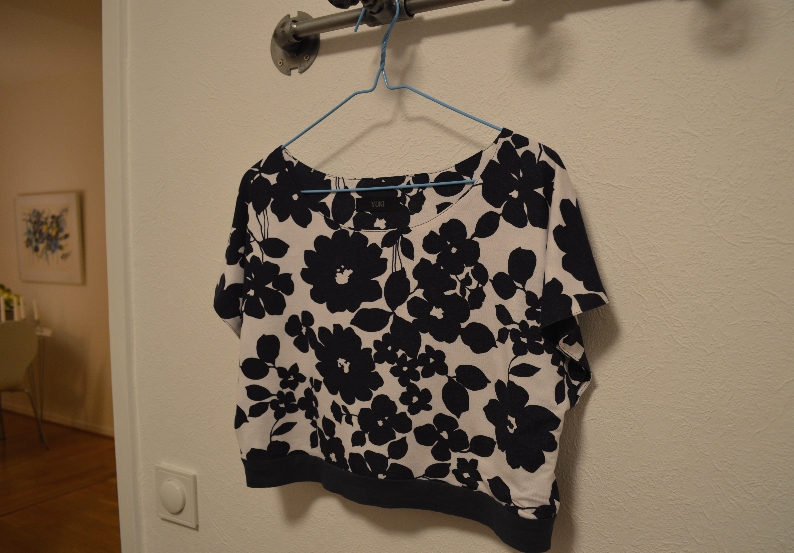
During the weekend I finally decided on what my next project was going to be, and it’s a dress! I will use two different fabrics for the skirt and the upper bodice to create a bit of contrast. An elastic waistband will be added to give the wearer an accentuated waist, while still keeping the dress comfortable. The length of the skirt should be somewhere over the knee. The upper bodice is made with kimono sleeves and a rather high neckline. For this first version of the dress, I’ve decided to use two soft knits (The one with the flowers is actually another case of buying-fabric-I-have-yet-to-find-a-project-for).

What are kimono sleeves you ask? Well, it’s a sleeve cut in one piece together with the bodice. Don’t confuse it with the traditional Japanese kimono sleeve which is cut as a part of its own.

So far, I’ve finished the bodice and to be honest, I wouldn’t mind just wearing that as a top to the beach in the summer. Darn, I gotta get rid of all the extra kilos I put on during Christmas!

I’m pretty excited about this dress, in my mind it will be amazing and an amazing dress needs a name, right? I wanted to find something that had to do with the lovely kimono sleeve and I consulted Wikipedia for some help. Apparently, the Japanese word for the sleeve (a proper kimono sleeve) is “sode” but that was completely out of the question after my hubby told me to check urban dictionary… Instead, the choice fell on Tamoto. “The Tamoto dress”, easily mixed up with the vegetable but still a nice name for a nice dress.


2 Comments

Black Tulle Petticoat

I’ve always wanted to have a petticoat and then it struck me, I actually got material for it somewhere deep down in my stash. I bought the material years ago and never got around to making anything out of it, until now.

As a base for the petticoat I used an ordinary black lining fabric. I cut a 3/4 circle skirt with a “waist” measurement that was large enough to fit over my hips. The fabric was then sewn to an elastic band that had a built-in frill (very convenient :) ).

At first I was planning on making three tiers of ruffles but I settled for two (otherwise it would’ve been gigantic!). The bottom tulle ruffle is attached to the fabric and the second tier is first attached to a piece of thicker and smoother tulle, which in turn is sewn to the fabric.tulle_petticoat1


15 Comments

Wedding Dress – Almost Finished!

Almost finished!

Almost finished!

Again, quite a lot has happened since my last wedding dress update. Researching and buying my new sewing machine took a considerable amount of time but I’ve still managed to do quite a bit of work on the dress.

  • Hand sewed the rest of the neckline
  • Fixed some seams in the draping in the front that I wasn’t satisfied with
  • Attaching the last two layers of the skirt
  • Hand sewed the two upper skirt layers to the zipper
  • Closed each skirt with a french seam below the zipper
  • Made the waistband and attached it to the dress with a few stitches here and there.
  • Cut off some excess fabric at the bottom
Detailed view of the inside of the neckline. Notice the two seams needed to keep it in check.

Detailed view of the inside of the neckline. Notice the two seams needed to keep it in check.

To finish the neckline, I basically had to hand sew it twice. The first seam was needed to force the silk chiffon to simply stay in place. Since I wanted the “zig-zag” pattern to be prominent, I had to stretch the fabric around the edge before securing it. The tension then caused the neckline to tilt out from the body. The tilting was fixed by stretching the fabric even further and then securing it with the second seam.

Attaching the last to layers and sewing them to the zipper wasn’t very hard, only time-consuming :) One interesting detail worth mentioning was the french seam below the zipper. It was a bit tricky and required a bit of hand sewing closest to the zipper but the result was pretty nice. Think I’m gonna post a guide on that when I can prepare some clear how-to pictures.

Now all that’s left to do is hand sewing the bottom hem. Just 9m to go, then it’s completely finished :D

Last but not least, the back of the dress!

Last but not least, the back of the dress!


3 Comments

Wedding Dress – Sewing and Unpicking

When I made the inner layer for the dress (the one lined with interfacing), I failed to comprehend why people say that sewing in silk is hard. Let’s just put it this way, now I know better. Sewing the middle layer really tested my temper. Simply sewing straight lines isn’t that hard. The problem arise when you reach a curve. the fabrics slides around and it feels like it’s harder to avoid puckering.

My friend with the pink evening gown, was a bit cross with herself for not buying silk for the inner layers of her dress while she had the chance. But now I can honestly say that it might have been for the best. Making it out of that grey lining fabric most likely saved both time and mind ;)

Wedding dress update. This is what it looks like with two layers kind of in place.

Wedding dress update. This is what it looks like with two layers pinned in place.

When sewing in silk, it feels like half the work is how to press the seams. Here’s a little tips that I picked up somewhere on the interwebs. I never really thought about that first step but now I will never forget it. Trust me, it makes a huge difference.

First press the seam without opening it. Then press it open on the wrong side. Lastly, give it a good press on the face side.

Next dress in progress!

Next dress in progress!

By the time I had “finished” the middle layer and began to admire my work, I realized that I needed to fetch my unpicker. I know, I know sometimes you have to unpick seams and that’s a part of sewing but at that time it felt like such a setback. Fed up with the dress for one night I said to myself, “screw this I’m gonna work on something different for the rest of the night”. Since I wanted to practise making bone channels before doing it on the real thing, and I was going to make another dress based on the same pattern anyway, I decided to kill two birds in one stone.

Cutting out the pieces for the second dress was super easy. I cut out two layers at once with the rotary cutter and didn’t bother with any interfacing. Even sewing was much easier this time. I guess half the reason’s the fabric and half practise.

Here’s me trying it on after ~1 evenings work. I have come to admire people who manage to take pictures of themselves in the mirror, it’s damned hard!

grey_dress


2 Comments

Kid’s skirt with snails

The finished skirt!

The finished skirt!

It’s my niece’s birthday and she’s getting a cute skirt with snails on it. Been thinking about doing something with the leftover fabric from the onesie and I reckon a birthday present is a good enough excuse for spending a couple of hours at the sewing machine. I always try to learn something new or refine an old method with each garment I make. This time I tried making a French seam to hide the overlock seam and I’m pretty happy with the end result (just can’t believe I didn’t think of it sooner!?). I also tried a new way of making a “waistband” from the same piece of fabric as the skirt, without cutting.

For once I thought I’d include a how-to.

Material: Fabric of your choice, elastic band and thread.

  1. Measure and cut the fabric. Fabric width = width*2, Length = length + ~4cm (hemline) + ~8cm (for the waistband). Adjust waistband size according to the size of the elastic band (the band I’m using is 2cm wide). The length of my elastic band is 50cm and the length of the finished skirt is 30cm. In theory this should fit a 1-1½ year old. Fingers crossed I’m right :)
  2. Pin the fabric with the wrong sides facing each other and sew. If you’re working with a patterned fabric, don’t forget to match it when pinning together. I’m using the overlocker for this seam.
  3. Iron, fold inside out and pin it face together. Give it a good press before sewing together.
  4. Fold inside out again, press and admire your work! Apparently this is called a “French seam” (learnt that from Great British Sewing Bee).
  5. Time for the waistline! I start by overlocking just to make the fabric a bit more manageable (it just keeps folding round and round…). I’m using another, more manageable fabric to show how I went about doing this.
  6. Fold down ~1cm and press.
    1. Fold over once more. Measure how big you want your waistband to be (mine’s 3cm).
    2. Fold again and press.
    3. Open up the folds. Fold up ~1cm from the skirt towards, and up onto the waistband.
    4. Press and fold it all together again. See picture for how it should look like.
    5. Sew the fold you made in step 6.3. Press the fold up like in the picture.
    6. Now sew it all together but don’t forget to leave an opening for the elastic band. Sew from the face side in order to make a neat and even seam. This is what the end result looks like.
    7. …and this is what it should look like from the wrong side. Neat and nice there as well.
  7. Put in the elastic band, sew it together and close the opening.
  8. Press and sew the hemline. Give it a final press, admire the skirt and feel good about yourself :D