
Detailed view of the cuffs
My source of inspiration for this piece was the manga/anime Black Butler (Kuroshitsuji). Looking at Ciel Phantomhive and his demon butler kind of makes me wish I was a man so that I could wear all of those lovely clothes.
The hell with it, I thought to myself. I am gonna make this, and I am gonna wear it. Androgynous clothes for the win!
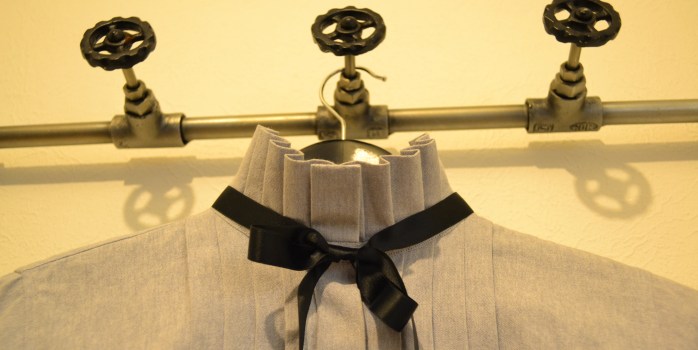
This shirt is made from a lovely grey cotton fabric, just thick enough for the collar to stand on its own and the pleats to stay neatly in place. The front buttons are hidden for a more well-dressed look. The fitting of the shirt is quite loose to not accentuate any female curves. To top it off, I added the black silk ribbon as a tie. It goes well together with this vest.

Grey shirt – front

Grey shirt – back

Pingback: Grey Vest | Yuki Clothing
April 12, 2013 at 10:56
Wowww I like it!! I’m learning how make my own clothes and this is really inspiring :-)
Pingback: Leather Pincushion | Yuki Clothing
August 15, 2015 at 04:07
I agree with RO, this is really nice. I’m learning to sew as well (and dear god can I just have all of Ciel’s excellent outfits?!) Would you happen to have a pattern or tutorial for this? I’ve been desperately trying to find how to make this shirt as I’m attending a con in September for my sweet 16 as demon Ciel Phantomhive.
August 15, 2015 at 18:27
I’m glad you liked it :) Well, I made that shirt long before I started bloging so I don’t have any written tutorial for it. I made the pattern based on a shirt I already had and if you own a shirt that you like, I suggest you do the same. You can of course also buy a pattern and just modify it but then you probably need to adjust the fitting. Pattern making is all about mathematics so make sure you get all the measurements correct. You want your pattern pieces as similar as possible to the shirt you’re copying.
Since you’re new to sewing, I recommend that you study “store made” shirts to understand how the pattern pieces are put together. This will also help you when constructing the pattern (e.g. how much seam allowance you need to put in at each seam). Also checkout some online tutorials so that you don’t miss anything important or nice short cuts.
As for the details of the shirt… The collar is made from simple rectangle if I remember correctly. Fold the rectangle once to make it more sturdy and then make pleats in the size you want. The shirt is made with “hidden buttons” on the front. Check out this tutorial: https://www.youtube.com/watch?v=Jwt9Pi_jZuo
The left and right front pattern pieces are extended quite a bit towards the center buttons and then the fabric was pleated. My pleats were quite big and for them to stay in place, I attached another piece of fabric to the back side. Every pleat was then sewn together with the “back piece”. I hope that makes sense to you :) I could take some extra pictures of some details of the shirt for you if that would help?
August 24, 2015 at 06:38
I’m terribly sorry for not replying sooner! Thank you for all your excellent advice, yes, it made sense. I won’t be needing extra pictures, but I’ll definitely be trying to make the pleats as I’ve decided to modify an existing shirt in an attempt to not bite off more than I can chew by making a whole new shirt ;) I bought a white shirt with hidden buttons and similar pleats, and grey/black fabric dye. I’m hoping for the best. Thanks again!
August 24, 2015 at 09:07
That sounds like a really good idea! And whatever you do, if you dye the shirt in your washing mashine, run it a couple of times without any laundry in it afterwards :) Good luck!