Yuki Clothing

plain and simple


2 Comments

Apron

I’ve been thinking about making an apron ever since I finished the rice pillow but it appears I needed a proper deadline to get started. Lucky for me, I got the opportunity to attend a cupcake baking class organized by my workplace. The baking class was this Monday so I had to finish the apron on Sunday. Look what a healthy amount of stress can do to your productivity!

The finished apron, with frills and all. Gosh I'm such a girly-girl :)

The finished apron, with frills and all. Gosh I’m such a girly-girl :)

I’m beginning to think that I should set a date for the darn wedding dress as well. Aug 1 sounds like a great date for finishing a dress. There we go, now that’s settled!

Anywho… Here’s the second result of my hard labour, cupcakes of pure awesomeness (I’m just a tiny bit proud of my accomplishment ;) ).

Behold them lovely cupcakes!

Behold them lovely cupcakes!


1 Comment

Boat curtains

This was hardly the most exciting sewing project but that doesn’t mean it wasn’t worth doing. The old curtains, that I made yeeeaars ago had gotten pretty badly bleached from the sun. And when I say pretty badly, I mean that they had almost turned white. So here’s a birthday present for my dad, new curtains for his boat! Happy birthday dad!

The finished curtains!

The finished curtains!


4 Comments

Transformational Reconstruction (TR Design)

Example of dress made using Transformational Reconstruction

Example of dress made using Transformational Reconstruction

Earlier, I promised you a post about a cool pattern making technique and here it is – Transformational Reconstruction! The designer behind the idea is Shingo Sato. As far as I know, he’s written one book on the subject, holds workshops and to top it off, runs a Youtube channel with “watch-and-learn-guides”.

The basic idea behind TR Design is to manipulate your  garment in 3D and not in 2D. Begin by creating a muslin with fitting of your choice and then fit it onto your mannequin (or other test subject). Next step is to grab a pen and draw your design straight onto the muslin. When your happy with your new design, remove the muslin from the mannequin and cut it open. You will most likely have a flat pattern ready to use by now but it that’s not the case, I recommend having a look at the video TR Cutting School – Easing and Forming. The last step is to cut out the new pattern pieces in a proper fabric and sew everything together.

I’m actually trying this out when making the pattern for my wedding dress. So far, I’m rather happy with this way of working. I had to make quite a few adjustments on my second muslin after noticing that there’s a huge difference in making a dress with one shoulder-strap and two shoulder-straps. Apparently one needs to make a really fitted bodice if one expects it to stay in one place. Today I learn. On the plus side, I just had to remove the straps and make the darned thing smaller and then later on, reattached the straps. Bridezilla transformation: successfully aborted! BOYAH!

Some day (when I’ve finished the dress) I’ll try out an even more elaborate design using transformational reconstruction.

For more information, I recommend checking out the Youtube channel, http://www.youtube.com/user/trpattern


3 Comments

Lilac cordial

Tulip vs Lilac. Striking resemblance?

Tulip vs. Lilac. Striking resemblance?

Usually, I stick to writing about my sewing adventures but tonight it’s time to share a great recipe for making lilac cordial. It was last year that I, to great surprise, found this recipe. For some reason, I was certain that lilacs were poisonous. Whatever gave me that idea, I don’t know. Perhaps I thought of tulips? Anyway, I’m still alive after drinking it for an entire summer :)

Went to visit my parents today and took the opportunity to raid their lilac tree. Naively, mum thought I was picking the flowers to look at them – not to eat them. Oh boy, could she have been more wrong :) And when we got home, I picked the first lemon on our lemon tree. I reckon making my own sugar is a bit over the top so this is as home-made as it gets ;)

Ingredients:

1l water
1kg sugar
~30 lilac clusters
1 lemon
20g tartaric acid

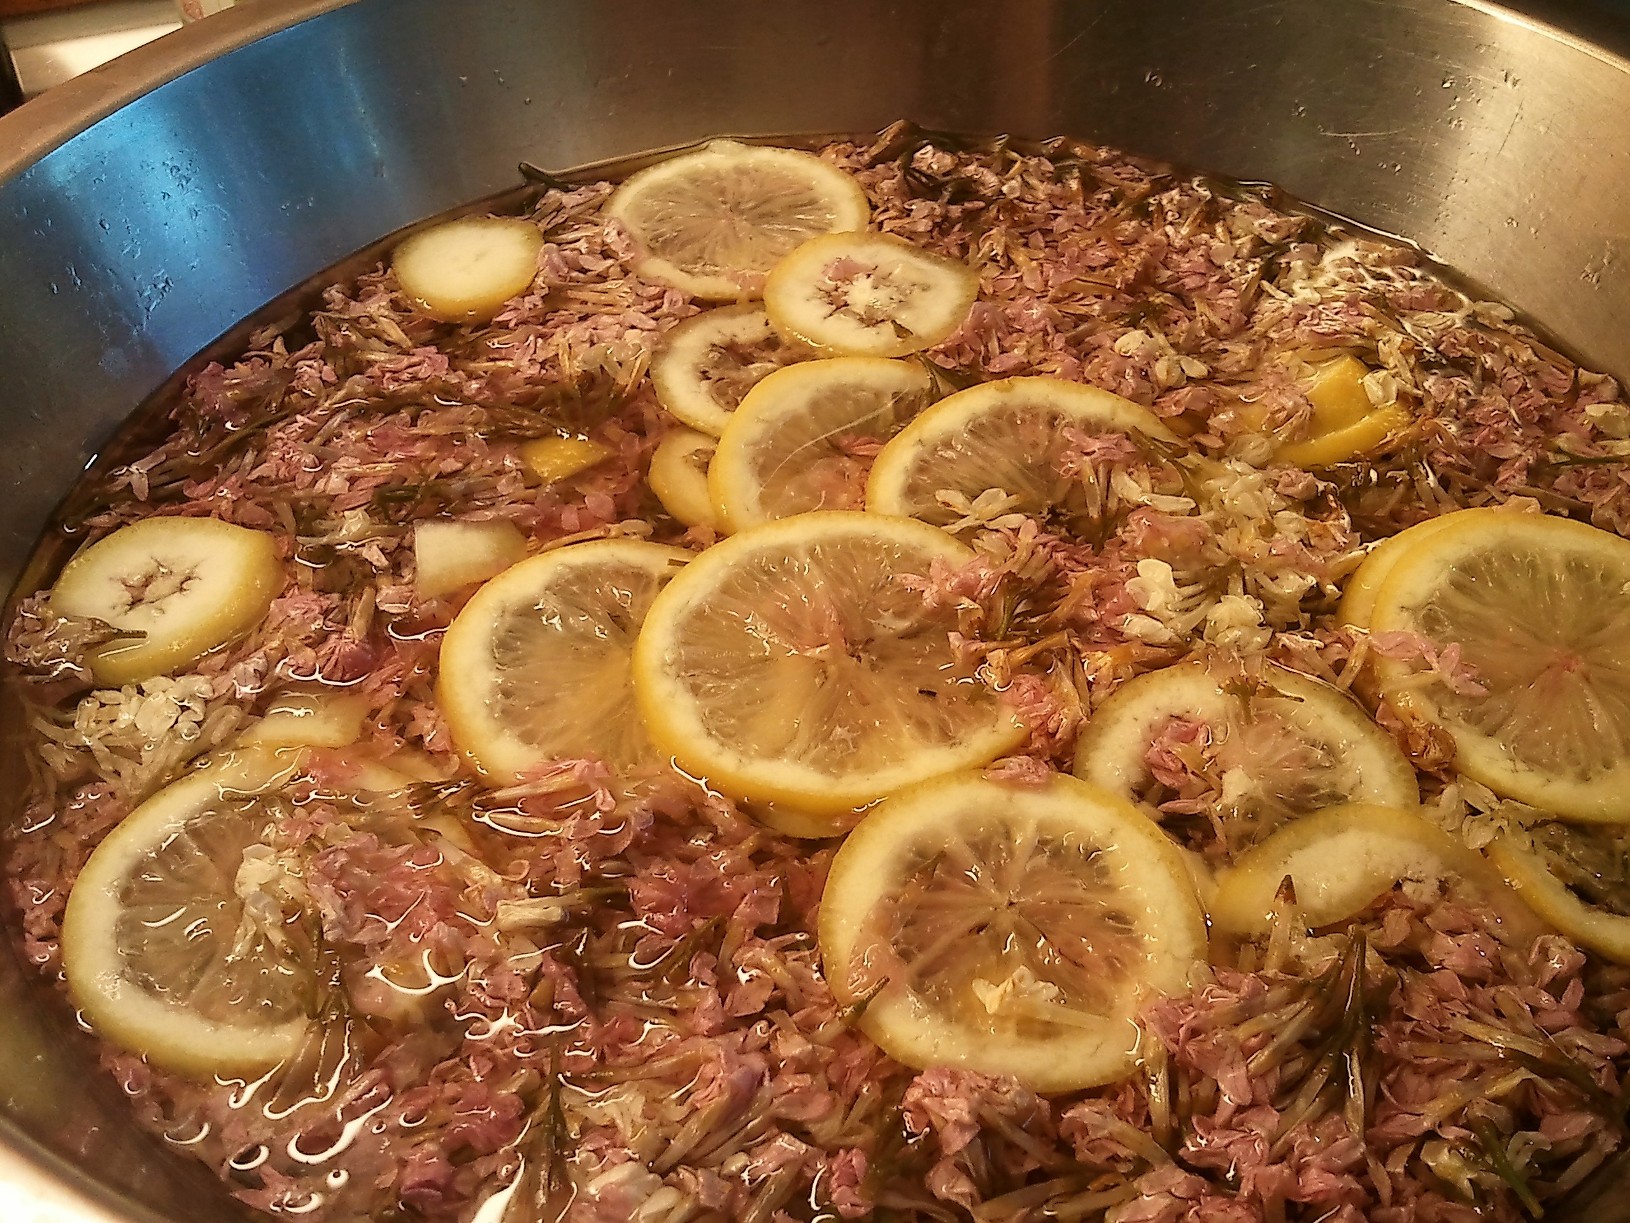
Mix water + sugar and bring to a boil. In the meantime, remove most of the branches from the clusters and slice the pre-washed lemon. Put the flowers and lemon in a heatproof bowl. When the sugar/water mixture is boiling, add the tartaric acid and pour it over the flowers. Let it cool down and store it in the fridge for 3 days. Strain through a sieve cloth and pour into cleaned bottles. Done!

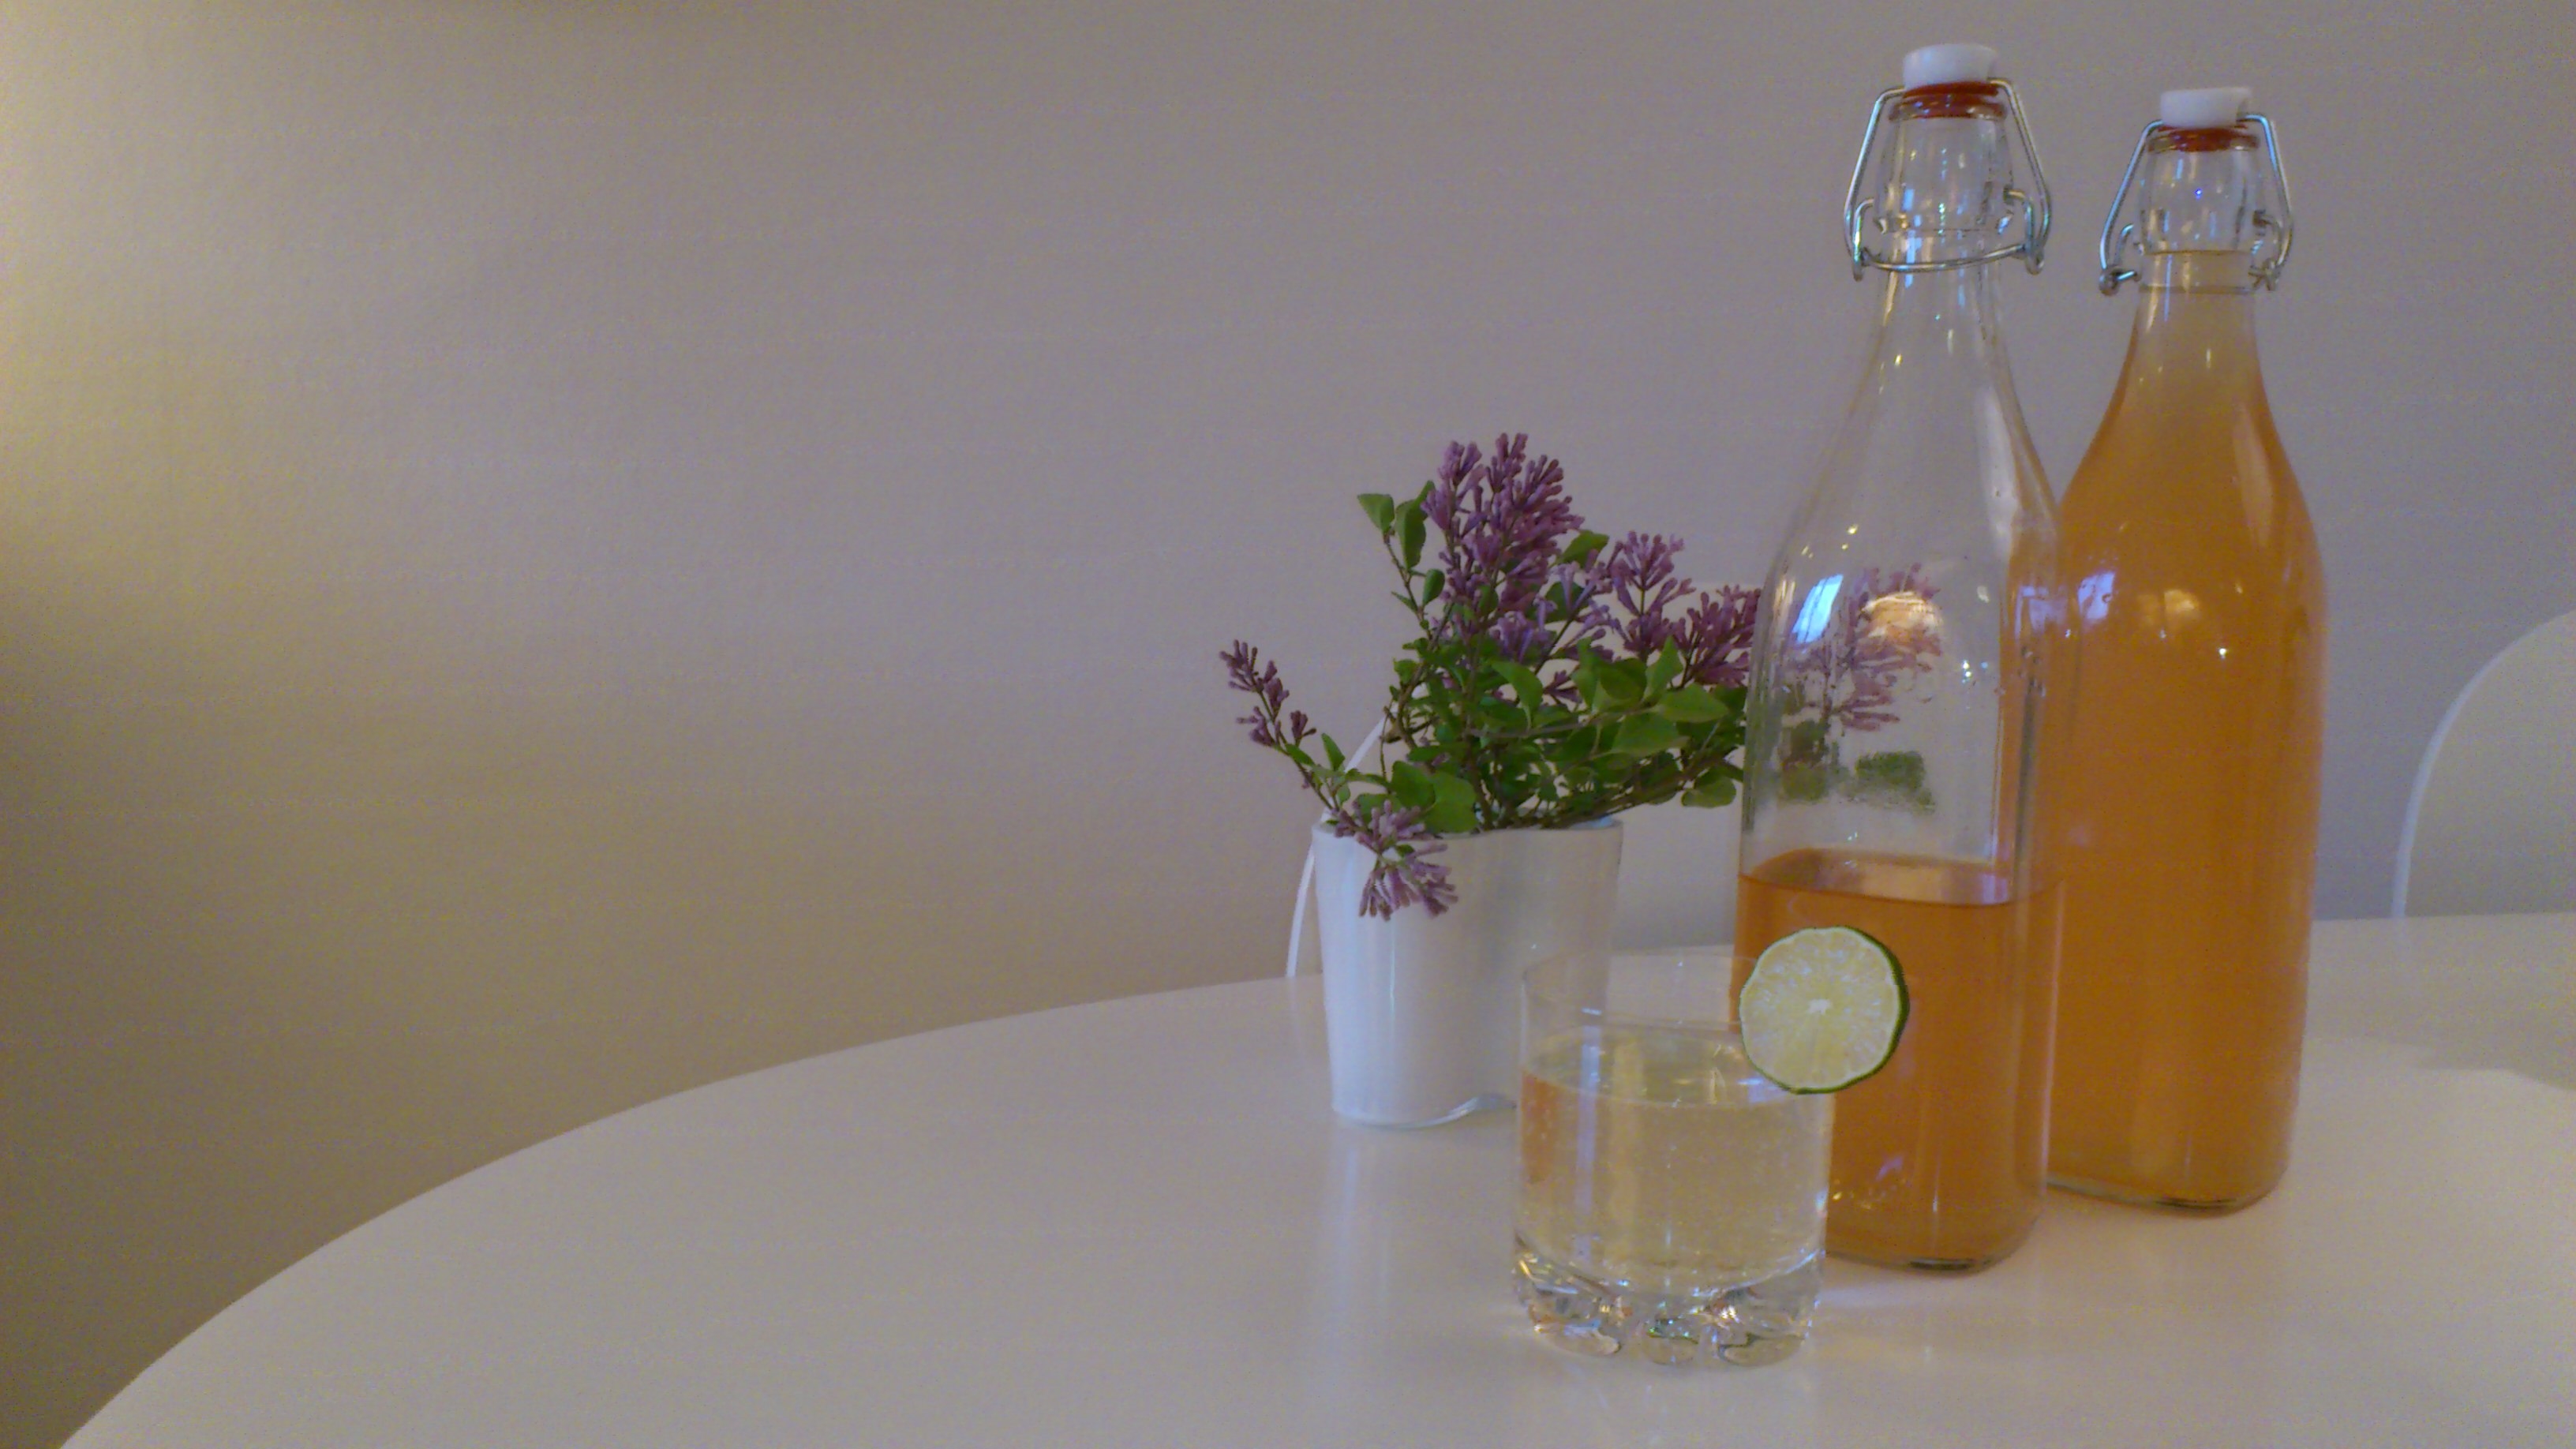
When serving, mix with water to your taste. Mix it with sparkling water (with some lemon/lime) for an awesome non-alcoholic drink.

Lilac cordial. My fiancé said that the first picture I took looked like scrimps and lemons so I had to take another one. Hopefully this one looks more like flowers than scrimps :)

Lilac cordial in the making! My fiancé said that the first picture I took looked like shrimps and lemons so I had to take another one. Hopefully this one looks more like flowers :)

The end result!

The end result!


8 Comments

Wedding dress – Round 1 (making the pattern)

It’s reached the point where I’m fed up with feeling stressed out about the wedding and in particular, the wedding dress. High time I actually started doing something about it!

Ever since I got my mannequin, my sewing have grown more and more ad hoc. Nowadays, I usually just have a basic idea somewhere in my mind and then make the pattern directly on Jenny herself. I actually find it much easier and a more interesting way of working. And this project is no exception. I made a hand-sewn muslin a while back that’s fitted to the upper bodice (I’ve just been looking at it for weeks).

Tip of the day: If you’re having problems with darts or the fitting over the boobs, try hand-sewing the tricky part. It really is much easier to get a nice looking result that way.

Now back to the muslin. The idea is to divide the upper part into almost equal sized stripes. Using a piece of cheap yarn, I made a quick draft of where to cut. I’m pretty happy with the result but I’d better sleep on it just in case. Next step is to cut it into pieces and make a new muslin :)

Good night!