Yuki Clothing

plain and simple


4 Comments

Yellow Asymmetrical Neckline Dress

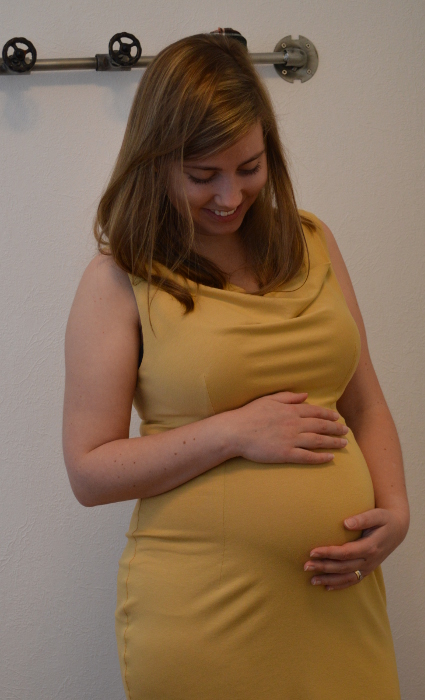
This third version of the “asymmetrical neckline dress”, was a little something I started working on right before Easter (hence the colour). I wanted a nice and comfortable dress that I could wear at home so I decided to make it in this wonderful yellow jersey that I bumped into at the fabric store.

I was also interested in seeing how the jersey would drape compared to the other fabrics. Even though it’s the same pattern, it looks quite different from both the tartan and the graphite dress. The other two fabrics had a bit more structure compared to this one, which basically lives a life of its own.

For more information about the pattern, check out Asymmetrical Neckline Dress – making the pattern

Now you might think that I’ve been holding onto this since Easter (when I was supposed to have finished the dress). Problem was that a bunch of other stuff got higher priority, like making a new dress for a spring wedding we were attending. Then I got very tired and nauseous which didn’t exactly put me in the mood for finishing the dress. Now that I finally had the time and energy to finish it, it doesn’t really fit like I thought it would when I started in April ;)


3 Comments

Tartan Asymmetrical Neckline Dress

By now, I wouldn’t be surprised if some of my loyal readers started to wonder if I ever made a tartan asymmetrical neckline dress. Did I perhaps give up after making the necktie? I certainly did not! Did I have the energy to blog about it? Nope, sadly I did not. But better late than never! :)

The main fabric for the dress is a medium heavy cotton fabric with a tartan print. Its properties are similar to my usual muslin fabric from IKEA, only a bit thicker. For the lining of the skirt, I used a regular lining fabric (probably polyester). The graphite version of this dress didn’t have a lined skirt and the only reason for that was that the inside of that fabric is very sleek as it is. The cotton however, needed lining, otherwise I would’ve ended up with a skirt moving higher and higher up my thighs.

An improvement from the graphite version of the dress are the belt loops. Since the tartan pattern changed between the skirt and the top, it would look much better with a belt. And to keep a belt in place, you need belt loops :) Another detail worth mentioning is the “chain sewed” thread that attaches the under skirt (lining) to the outer skirt. This keeps the under skirt from sliding around.

I’ve also included a neat way of sewing darts and fastening the thread. Just start sewing your dart and when you’re close to the edge, carefully sew a couple of stitches parallel to the edge. After the parallel stitches, steer the needle over the edge and sew ~1-1.5cm without any fabric. Stop sewing, lift the presser foot and move the fabric towards you. Now sew a couple of stitches on the dart to fasten the thread. It’s quick and easy and the result looks great every time.


1 Comment

Tartan Necktie

For New Year’s I planned to make a tartan version of the asymmetrical neckline dress with a matching necktie for my husband. Knowing that I’m a hopeless time optimist, I cut out the pieces for the dress and then started with the tie. That way I would at least be able to finish one of the two. It proved to be a wise decision.

There’s an abundance of tutorials on how to make a necktie but the one that looked professional is this one. I pretty much followed the instructions, except I sewed everything by hand. The tutorial doesn’t say that much about how to make the pattern but it’s hardly rocket science. I simply took one of my husband’s favourite ties and made a pattern from that. The tie is constructed from 7 parts.

  • 3 parts for the outer fabric (wide, middle and narrow end)
  • 2 parts for lining the tips (also cut in main fabric)
  • 1 slightly thick interlining that’s put inside the tie (to give it some weight)
  • 1 keeper

The main fabric is a medium weight cotton fabric with a tartan print. Even the selvage was pretty so I decided to use it for the keeper. I didn’t have any suitable wool fabric in my stash for the interlining so I took two layers of left-over flannel from when I made my Minoru jacket and basted them together to give the interlining some weight.

The observant reader might notice that the pattern pieces for the main fabric doesn’t add up and that is absolutely correct. I managed to flip the pattern for the narrow end of the tie which meant that it didn’t fit together with the middle part. I quickly solved it by drawing a new pattern for the middle piece. Of course I managed flip that piece as well and had to re-do it a third time. That’s what happens when there’s too much blood in the caffeine circulation…

Overall I’m very happy with both the project and the outcome. It’s so nice to take your time and really make something properly. The sewing machine is very effective but a bit of hand sewing tends to make a garment just e little bit more special.


6 Comments

Sewing Room Reorganization!

Have you ever found yourself being blind to flaws? Everything is fine as long as you’re blissfully unaware of the situation but when you suddenly start to see the problem, it just wont go away. It’s a bit like the Matrix, once you’ve seen the lie it becomes impossible to ignore. My ‘Matrix’ was the sewing room (or rather sewing corner because the same room also works as an office). I knew already beforehand that the room was a bit untidy and that I had collected quite a number of things that was bursting out of the tiny wardrobe. But I didn’t see just how awful it was until we returned from Japan after four weeks of vacation.

I’m pretty certain it’s obvious, but this is what my sewing corner looked like before the reorganization:

Like the proper Swedes we are, my husband and I went to IKEA to get a new and bigger wardrobe. We got two 50cm PAX wardrobes with two BERGSBO doors. The possibly best feature with the PAX wardrobe is the pull-out-tray KOMPLEMENT that I’ve put one of my sewing machines on. Whenever I need it, I just pull out the tray and grab the machine. Wave goodbye to the risk a strained back!

Another feature I’m very fond of is the box combination HYFS that fits perfectly inside the drawers. Inside the boxes, I’ve organized ribbons, elastics, pins and needles, scissors, you name it! It no longer matters if things slide around inside the drawers because they will be separated by the boxes.

Behold my sewing corner after the reorganization!

In the space between the wall and the wardrobe, I store everything that’s too big to fit inside the wardrobe. For example, a cutting mat, pattern paper, large rulers and my cheap muslin fabric (also IKEA). The observant reader might’ve already noticed that my Pfaff Hobbylock is gone and instead there’s a Janome MyLock 644D. The Pfaff was alright but it broke down right in the middle of my Asymmetrical Neckline Dress project and I had to buy a new one. I guess all machines have their quirks and you learn to deal with them as time goes on. So far, I find the Janome easier to deal with (especially when it comes to thread tension) and I’m really glad I bought it.


9 Comments

Asymmetrical Neckline Dress (part3) – the Graphite Dress

It’s time to show you the final version of the Asymmetrical Neckline Dress! If you’re interested in how the pattern was constructed and how the muslin turned out, you can read about it here and here.

The fabric for this dress is something I picked up on our first trip to Japan. While in Tokyo, we paid a visit to Tomato, a really nice fabric store in Nippori (Fabric Town), and there the it was! The fabric was just sitting on its shelf, waiting for me to bring it home. :) My original plan for it was to make a blazer or something but as soon as I started planning this dress I knew I had to use it. I love how well it drapes, and the colour is just gorgeous.

And of course, you’ll get some pictures from the wedding I wore the dress to. The weather was great during the afternoon. It was quite windy but the sun was shining brightly. This meant that my hair was all over the place, and looking into the camera wasn’t an easy task.