Yuki Clothing

plain and simple


6 Comments

Finished bedspread

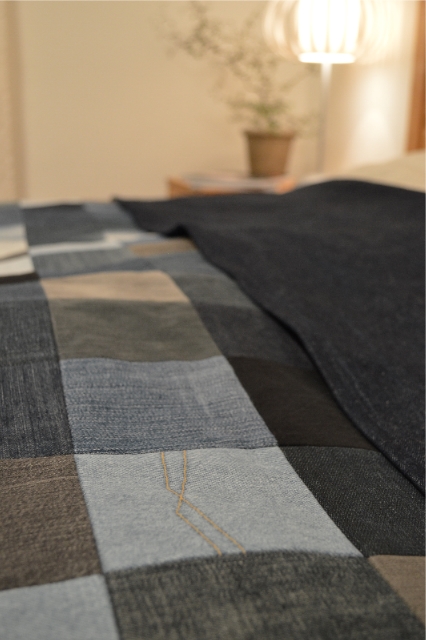
It’s been over a month ago since I first told you about the bedspread made of recycled denim. I’m now happy to tell you that it’s finally finished! For about two to three weeks I’ve been thinking “this will finally be the day when I finish it” but no, no, it always takes longer than I expected. However, yesterday was the day :D

When I got to making the back side of the bedspread I went to the store to buy some denim. That part went well. I usually pre-wash all fabrics but I just didn’t feel like pre-washing and ironing 8m of heavy denim. Feeling lazy, I just cut the fabric pieces that I needed and start ironing them. After a while I looked at my hands and realized that karma just punched me right in face. Saying I looked like a Smurf might be a slight exaggeration but let’s just say that I really needed to wash the fabric.

Washing means shrinkage and that was something I hadn’t taken into account when I cut the fabric. Sure, I did cut some extra but nowhere near the 5% needed. Fortunately there were just enough fabric left after washing it twice in cold water and stretching it afterwards. *phew*

At first I had planned on adding a 10cm border around the entire bedspread in the same denim as the one I used for the back. However, I decided to add a smaller border (~1cm) instead. It looked just as good and quite frankly, easier to sew. So I got to use my bias binding maker for the first time and it worked like a charm – even on the thick denim!

Now that I’ve finished this project it’s about time I started working on my pattern grading skills and grade the pattern for the Tamoto dress.


12 Comments

Tamoto dress

I promised you some pictures of me wearing the finished Tamoto dress and I reckon it’s about time I got around to doing that. Now that I’ve worn it a couple of times, what do I think of it? Well, I think I’ve fallen even deeper in love with it. It’s just plain awesome.

Me in the Tamoto dress. In the background you see the bedspread project

Me in the Tamoto dress. In the background you see the bedspread project

Apparently, I’m not the only one who likes it and I was asked for the pattern (Yay! *happy dance*). When I get back from my ski travel I will definitely look in to making a pdf pattern for the dress. Only trouble is that I need to learn how to grade my pattern. I’m also a bit unsure about how to make a pdf with a full size pattern. Making one with a down sized pattern that fits on one page is super easy but making it bigger could potentially give me some grief. If you’ve got any tips/tricks/ideas on the subject, please leave a comment!


Leave a comment

How to hem jeans with the original hem (magic hem)

I’ve always been quite short, and growing up I always had to re-hem every new pair of trousers I got. Back then, I  simply cut off some of the length and made the hem from scratch. While I ended up with jeans of a more suitable length, I always felt that the clean, new hem didn’t match the rest of the look. If only I had known about the “magic hem”!

http://www.youtube.com/watch?v=8XJaTBqc2Kc

The instructions given in the video aren’t always clear so I recommend that you watch it closely to get a hang of what Mr. Hyi Lim is doing. I’ve seen a couple of other videos on the subject as well but those were forgetting one detail. That is to hide the seam allowance/left-over fabric inside the hem. If you follow the instructions in this video, you should end up with a neat looking result both on the outside and the inside.

I can’t wait to try this out. I almost feel like buying a pair of jeans in the wrong size, just for the sake of it!


13 Comments

Bedspread – a work in progress

My latest project is actually a recycling project where I’ve used 25 pair of old jeans and cut them into squares. Since I didn’t have this many old jeans myself, a bunch of friends came to my rescue and donated trousers that were either ragged or too small (a huge thanks guys!). When I first got this brilliant idea, I never stopped to think about just how many squares I needed to cut and sew together. I only knew that I wanted them to be around 10x10cm. Later on, when I had cut out around 50 squares and wanted to know how many I actually needed, I finally did the maths… I wanted a 2,5×2,5m bedspread which resulted in a staggering 625 squares! But since I don’t like giving up, I just kept on cutting and finally ended up with this.

Yay, now it looks like mini fabric skyscrapers! :D

Yay, now it looks like mini fabric skyscrapers! :D

When it was time to actually start sewing I decided to sort all the different jeans into one stack each. That way it would be easier to distribute them evenly across the bedspread. That tactic worked well and an hour later, I had 25 stacks on my table with each stack containing 25 squares.

All 25 pair of jeans, neatly sorted.

All 25 pair of jeans, neatly sorted.

My first approach to sewing everything together was to sew one row at a time and then sew the rows together. The only problem with that idea was that I had a hard time lining up the seams perfectly. This prompted me to try a new approach that focused more on the fact that it’s squares I’m stitching together. Two squares on the first row are sewn together and then two on the second row. The those four squares are then sewn together. Hopefully the picture explains it a bit better. I have absolutely no idea if that’s how quilters does it or if there’s a better way but it’s working out alright for me.

I had hoped that I would’ve been able to show you a finished project by now, but that’s not the case. Never in my life would I have guessed that making this bedspread would take this much time. Clearly I’ve underestimated my opponent. Not only have my patience and sanity taken a toll during this tiresome project, but two  needles have lost their lives in tragic accidents.

A victim of the bedspread!

A victim of the bedspread!

And this is all I’ve got to show you today. Not many squares left to put together, which is good because I’m running out of thread! :O


6 Comments

The trick to watching the Great British Sewing Bee outside the UK

<Update> Since MediaHint now wants to charge people for their service, I recommend that you use Hola instead. It might even be better than MediaHint since you can pretend that you currently reside in pretty much any country. For instance, we used it a lot in Japan to watch some Swedish tv.

Hola is available for Chrome, Firefox and Explorer and you’ll find it here:

http://hola.org/


Do you want to watch the latest season of the Great British Sewing Bee, but the BBC iPlayer won’t let you? By using MediaHint, you can bypass this silly Geo-restriction. All you need to do is install it and then you never need to think about it again. It doesn’t work for all sites with geo-restrictions, but so far I’ve found that it works great with BBC and Netflix.
The MediaHint addon is available for the following browsers:
Firefox: https://addons.mozilla.org/en-US/firefox/addon/media-hint/

Chrome: https://mediahint.com/install_chrome.html

When you’re done with the installation, all you need to do is start watching! BBC iPlayer – The Great British Sewing Bee (Season 2)

Good luck and have fun!