Yuki Clothing

plain and simple


2 Comments

Finally, my bobbin winder is back in business!

After months of waiting, I finally got my hands on the missing rubber ring that’s needed for my bobbin winder to work. Gone are the months of having to, annoyingly slow, wind the bobbins on my old Janome machine. It took me 6 months of fiddling, but my wonderful Singer 20U-53 is now complete! I know this is a pure “sewing machine porn” post but I just can’t help myself. Don’t you just love it when you get more presser feet/needles/sewing machines/other gadgets to further fuel that hobby of yours? :)

For my Swedish readers, I can highly recommend Indukta. With very reasonable prices and great service, these are your go-to-guys when you need more needles or your sewing machine is acting up. So far they’ve managed to answer all my questions and get me all the spare parts I’ve needed.

And of course, here’s a link to their home page: http://www.indukta.se/


4 Comments

Tamoto Dress – finished!

I finally got around to finishing the Tamoto dress and I’m totally in love with it! It’s so comfy I don’t ever want to take it off. The best thing about it could be the elastic waistband. You get to look gorgeous and at the same time don’t have to worry about eating too much of that delightful dinner, all because the waistline just expands. How awesome is that?

The back side of the dress

The back side of the dress

I’m sorry there’s no pictures of me wearing the dress this time but that’s because I had eye surgery this week (not the eye itself but the soft tissue on the lower eyelid). I’m pretty alright by now. The bleeding has stopped and it doesn’t hurt as much but my eye still needs a lot of rest and I can’t wear any make-up. Right after the surgery I looked like a drunken pirate, with eye patch and all, still a bit groggy from the drugs they gave me :D Anyway, you’ll need to wait a bit longer for some better picture. I just can’t help feeling a bit vain :)


1 Comment

Rolled hem presser foot

I got a very pleasant surprise when I got home today. I had completely forgotten about this little beauty that I ordered for my Singer 20U-53 just before Christmas! What you see is a presser foot that produces a 5.6mm rolled hem as it goes along. The curve in the middle of the foot guides the fabric around and the needle stitches it all in place with a straight stitch. At least that’s the theory. I’m telling you, rolled hems can be quite tricky and I find that pretty much all the fabrics I throw at it behaves differently. Before ever attacking a garment with this, you need to try it out on some fabric scraps.

So far I’ve never used a rolled hem presser foot on stretch jersey but I was thinking now would be a good time to start. After all, I need to finish the hem on the Tamoto dress. First I tried it out on the super-stretchy side and oh well, it looked like s**t before it’s encounter with the iron. Perhaps the problem was that the pressure from the presser foot was too strong. Maybe if I tuned it down a bit, the fabric would flow better and I wouldn’t end up with a wonky mess?

Flipping the fabric around and trying another side (still stretchy but not super-duper) gave me a better result but there’s still room for improvement. The foot works just fine on some good ‘ol cotton so I’m finding this a tad bit annoying. Has anyone got any experience with using such a foot on stretch jersey? Any ideas you’ve got are more than welcome!


6 Comments

Leather Pincushion

I’m proud to present my latest invention – the washable hand pincushion with a leather base! Before I present all the lovely ideas behind this pincushion I feel it’s only appropriate to talk about the first version before I give it a proper burial in the trash bin.

When I started sewing clothes more seriously a couple of years ago, it didn’t take long before I realized I needed a pincushion that I could wear on my hand. Just sticking the pincushion on the wrist would’ve worked but it wasn’t good enough. I wanted the cushion to be closer to my (right) working hand to minimize the distance my hand needed to travel to pick up a pin. Surely that should speed things up a bit. That was when I came up with the first prototype of the hand pincushion.

R.I.P. my faithful old pincushion.

R.I.P. my faithful old pincushion.

I cut out a piece of cardboard paper the size of my hand as a base (we wouldn’t want the pin to go through and hit the hand, now would we). Some leftover fabric from my grey shirt was turned into a casing. Two straps were added, one fixed size and one with sewed on velcro. Then all it needed was some stuffing and a seam to close the whole thing up. It has served me well for years but it didn’t take long for it to get dirty (unfortunately ladies got hand sweat as well). Only problem was that cardboard paper doesn’t do well with water… Clearly I needed something that could handle washing up.

My list of requirements:

  • The base should be tough so that I don’t accidentally pin myself
  • It should be attached to the hand, not the wrist
  • It needs to be washable
  • The fabric on top may not be too dense. It should be easy to put the pins in the cushion
  • Easy to take on and off

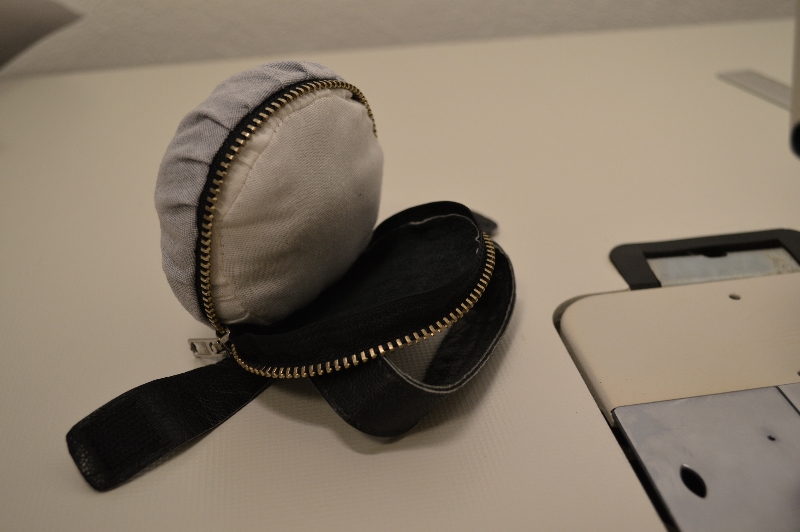
For the first requirement, I decided that some medium thick leather should do the trick. It would be thick enough for the pins not to go through but still flexible enough to follow the hand. Of course, leather also gets dirty but it doesn’t “soak” it up the same way fabric does. This means it shouldn’t need washing that often. No cardboard paper means that it’s washable but do we really need to wash everything? I think not! That’s why I’ve added a removable inner cushion and of course a zipper to enable the removal. When closed, the slider of the zipper is facing out, away from the wearer so that it’s not in the way.

Peek-a-boo! There's the hidden inner cushion.

Peek-a-boo! There’s the hidden inner cushion.

As for fabric choices, I went with a very thin fabric for the inner cushion. You barely feel any resistance as you pierce it with a pin! Since I was so pleased with the grey fabric, I decided to continue using it for the outside fabric. I also liked the velcro fastening on the first version so I decided to keep that as well.


7 Comments

Tamoto dress

During the weekend I finally decided on what my next project was going to be, and it’s a dress! I will use two different fabrics for the skirt and the upper bodice to create a bit of contrast. An elastic waistband will be added to give the wearer an accentuated waist, while still keeping the dress comfortable. The length of the skirt should be somewhere over the knee. The upper bodice is made with kimono sleeves and a rather high neckline. For this first version of the dress, I’ve decided to use two soft knits (The one with the flowers is actually another case of buying-fabric-I-have-yet-to-find-a-project-for).

What are kimono sleeves you ask? Well, it’s a sleeve cut in one piece together with the bodice. Don’t confuse it with the traditional Japanese kimono sleeve which is cut as a part of its own.

So far, I’ve finished the bodice and to be honest, I wouldn’t mind just wearing that as a top to the beach in the summer. Darn, I gotta get rid of all the extra kilos I put on during Christmas!

I’m pretty excited about this dress, in my mind it will be amazing and an amazing dress needs a name, right? I wanted to find something that had to do with the lovely kimono sleeve and I consulted Wikipedia for some help. Apparently, the Japanese word for the sleeve (a proper kimono sleeve) is “sode” but that was completely out of the question after my hubby told me to check urban dictionary… Instead, the choice fell on Tamoto. “The Tamoto dress”, easily mixed up with the vegetable but still a nice name for a nice dress.